SCCM 2012 R2 – Deploying Microsoft Office 2013 Professional Plus

In this post I will give detailed instructions on how to deploy Microsoft Office 2013 Professional Plus

While I have done this with SCCM 2012 R2 in this guide the process is identical for SCCM 2012, 2012 SP1 and Microsoft Office 2010 Professional Plus

  1. Navigate to the location of the install media and open a CMD windowSCCM 2012 R2 - Deploying Microsoft Office 2013 Professional Plus - 01
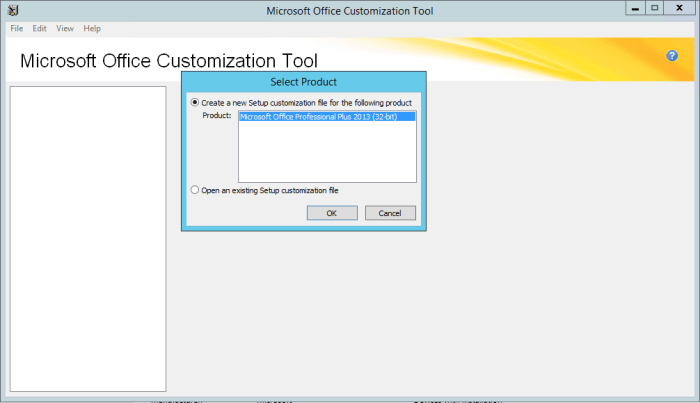
  2. Type “setup.exe /admin” and press EnterSCCM 2012 R2 - Deploying Microsoft Office 2013 Professional Plus - 02
  3. When the product selection screen appears, select the product you wish to install (there will usually only be one)SCCM 2012 R2 - Deploying Microsoft Office 2013 Professional Plus - 03
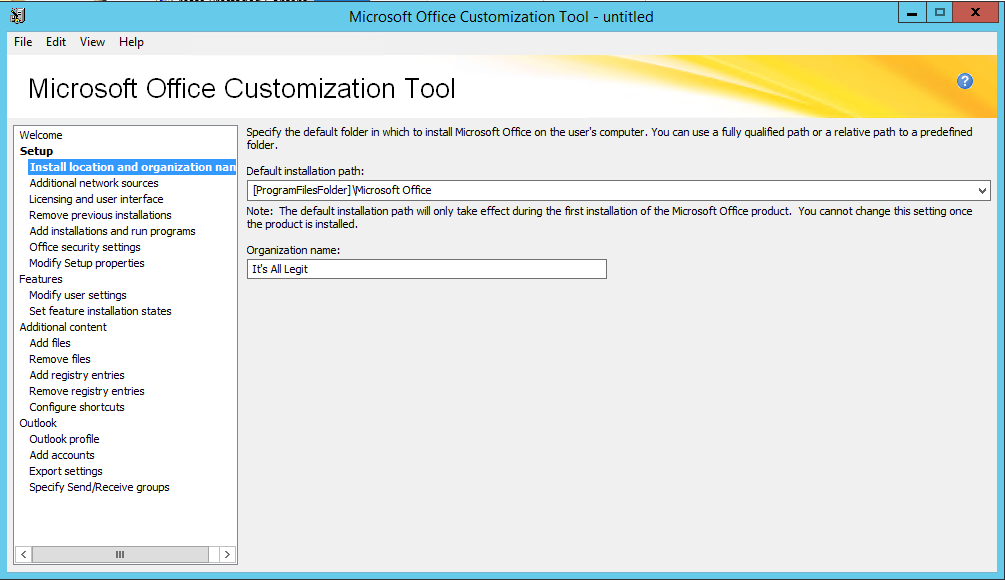
  4. Navigate to “Install location and organization name”
  5. Type in your organization name (This step is not required)SCCM 2012 R2 - Deploying Microsoft Office 2013 Professional Plus - 05
  6. Navigate to “Licensing and User Interface”
  7. At my location I have a KMS server running which services all my clients for me. If you do not have this you can enter you MAK key here
  8. Click “I accept the terms in the License Agreement”
  9. Change “Display level” to “None”
  10. Ensure “Complete notice” remains unchecked and check “Suppress modal” and “No cancel”SCCM 2012 R2 - Deploying Microsoft Office 2013 Professional Plus - 06
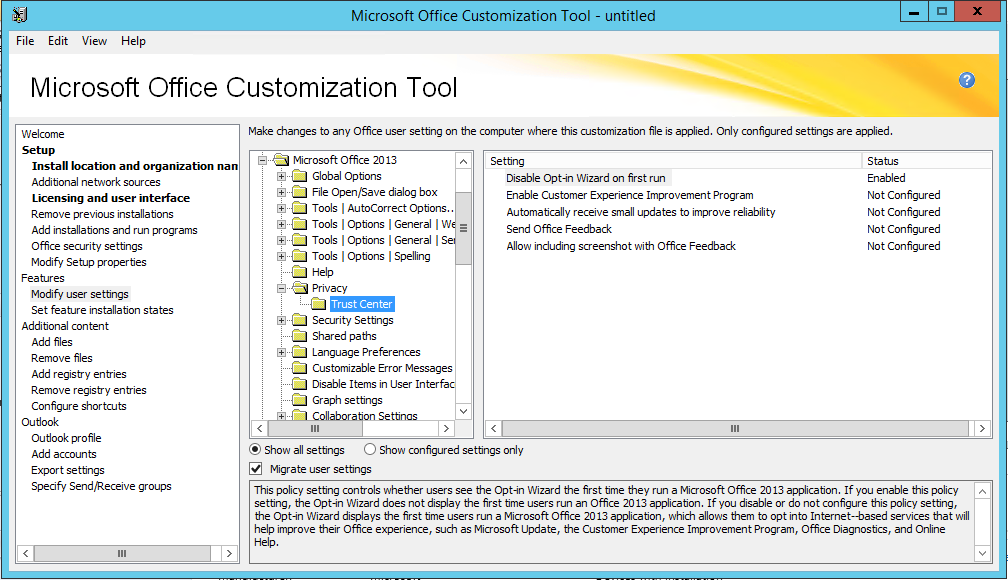
  11. Navigate to “Modify user settings”
  12. In the left of the two panes, navigate to “Microsoft Office 2013\Privacy\Trust Center”
  13. In the right pane double click on “Disable Opt-in Wizard on first run”SCCM 2012 R2 - Deploying Microsoft Office 2013 Professional Plus - 07
  14. Select “Enabled” and click “OK”SCCM 2012 R2 - Deploying Microsoft Office 2013 Professional Plus - 08
  15. Confirm that the status is now set to enabledSCCM 2012 R2 - Deploying Microsoft Office 2013 Professional Plus - 09
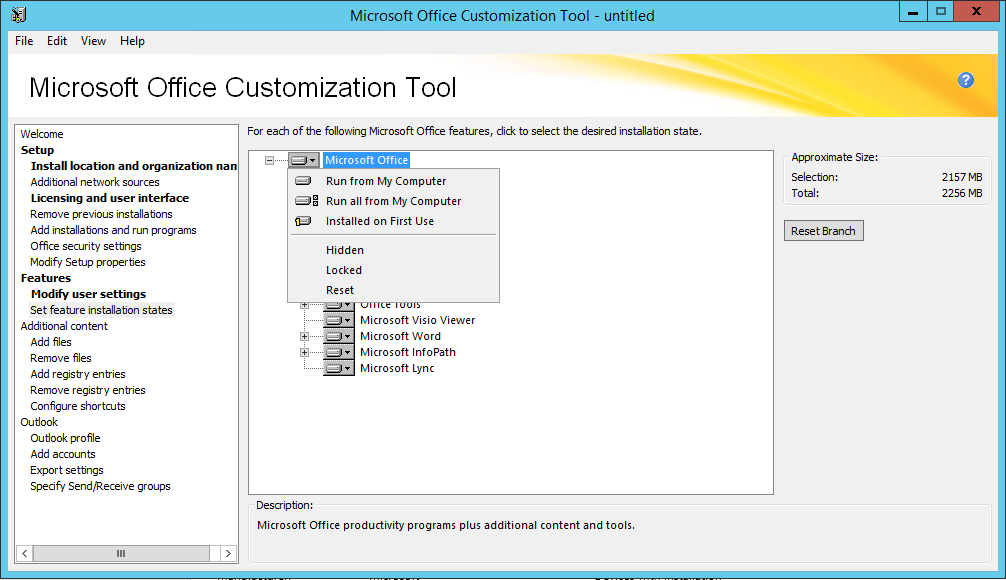
  16. Navigate to “Set feature installation states”
  17. In the right pane, click on “Microsoft Office” at the top of the tree and select “Run all from My Computer” from the drop-down menuSCCM 2012 R2 - Deploying Microsoft Office 2013 Professional Plus - 10
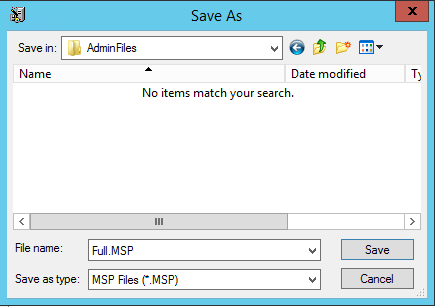
  18. One this is done save the MSP file. I have chosen to create a folder in the source media folder and call it “AdminFiles” and then the file name as Full.MSP, so that i can create individual installs for Excel, Word, etc. you can set any name, but it is much easier later if you don’t include spaces in the nameSCCM 2012 R2 - Deploying Microsoft Office 2013 Professional Plus - 11
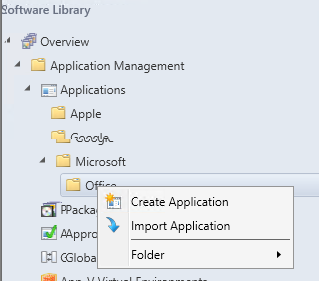
  19. Within the SCCM console, navigate to “Software Library”, “Application Management”.
  20. Right click on “Applications” or a folder that you have created under this and click “Create Application”.SCCM 2012 R2 - Deploying Microsoft Office 2013 Professional Plus - 12
  21. Select “Manually specify the application information” then click “Next”SCCM 2012 R2 - Deploying Microsoft Office 2013 Professional Plus - 13
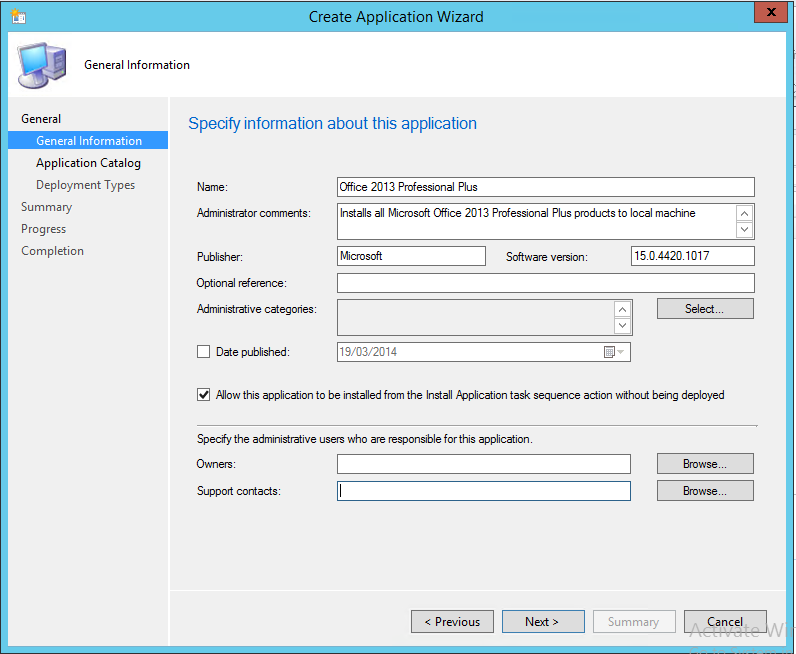
  22. Fill the the appropriate fields with the information you wish to provide, then click “Next”SCCM 2012 R2 - Deploying Microsoft Office 2013 Professional Plus - 14
  23. Fill the the appropriate fields with the information you wish to provide. If you wish to have a custom icon for the Application Catalog choose it here, then click “Next”SCCM 2012 R2 - Deploying Microsoft Office 2013 Professional Plus - 15
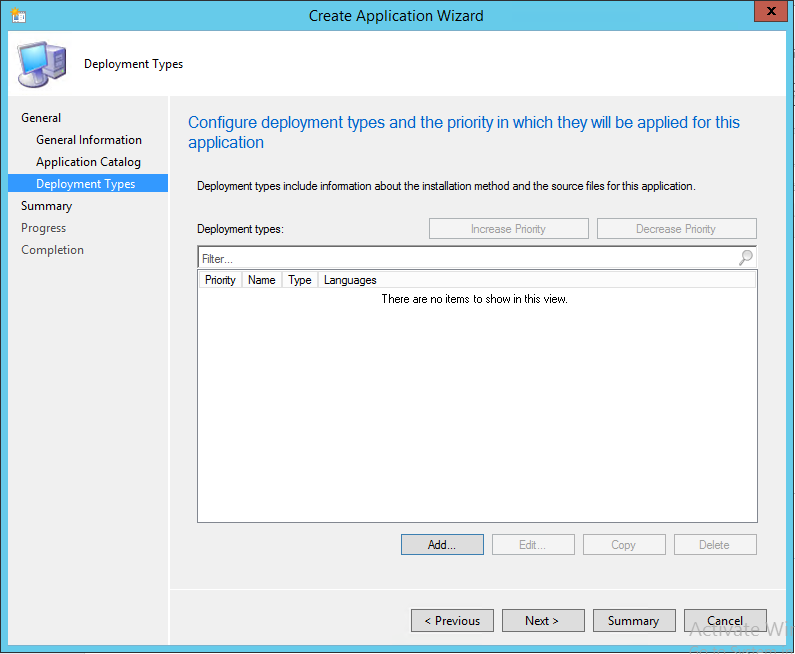
  24. When you reach the “Deployment Types” field, click “Add”SCCM 2012 R2 - Deploying Microsoft Office 2013 Professional Plus - 16
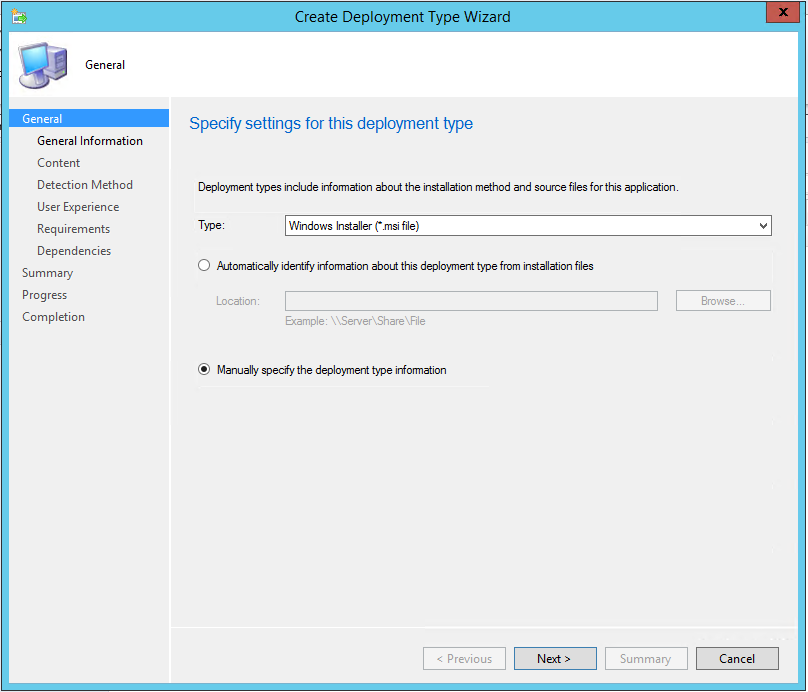
  25. Within the wizard that opens up, select “Manually specify the deployment type information”. Then click “Next”SCCM 2012 R2 - Deploying Microsoft Office 2013 Professional Plus - 17
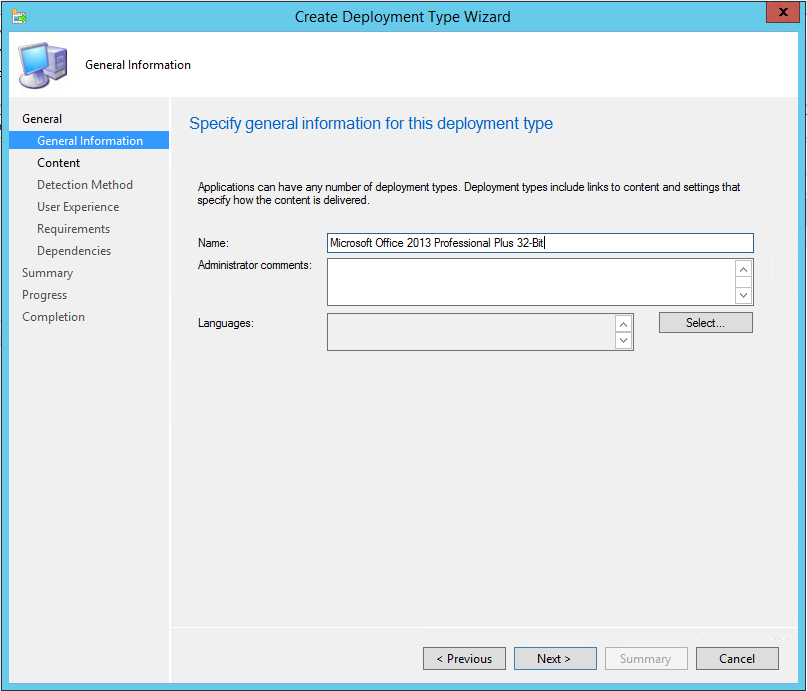
  26. In the “Name” field, type “Microsoft Office 2013 Professional Plus 32-Bit” as this is a 32-Bit deploymentSCCM 2012 R2 - Deploying Microsoft Office 2013 Professional Plus - 18
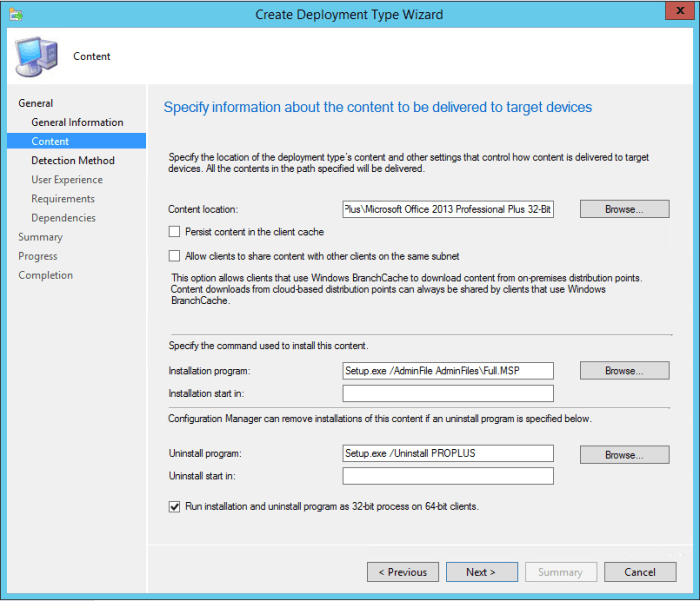
  27. Enter the content location of the source media (extracted folder obviously)
  28. In the “Installation program” field, type “Setup.exe /AdminFile AdminFiles\Full.MSP” (Or whatever you called your MSP file)
  29. In the “Uninstall program” field, type “Setup.exe /Uninstall PROPLUS”
  30. Tick “Run installation and uninstall program as 32-bit process on 64-bit clients” and click “Next”
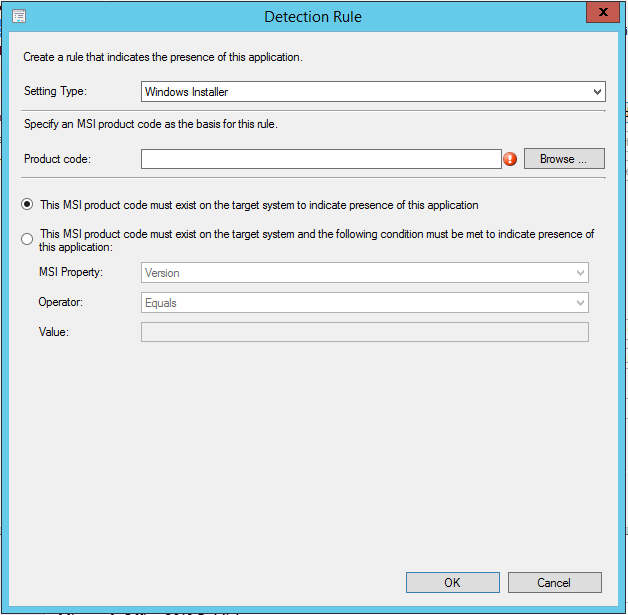
SCCM 2012 R2 - Deploying Microsoft Office 2013 Professional Plus - 19
  31. Click “Add Clause”
  32. Change “Setting Type” to “Windows Installer”SCCM 2012 R2 - Deploying Microsoft Office 2013 Professional Plus - 20
  33. In the “Product code” field, click “Browse”
  34. Navigate to the source media, then proplus.ww. Select “proplusww.msi” and click “Open”SCCM 2012 R2 - Deploying Microsoft Office 2013 Professional Plus - 21
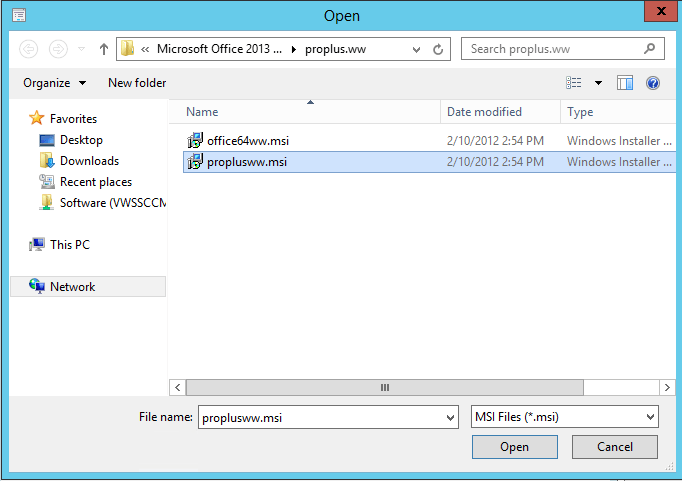
  35. Select “This MSI product code must exit on the target system and the following condition must be met to indicate the presence of  this application”. Then click “OK”SCCM 2012 R2 - Deploying Microsoft Office 2013 Professional Plus - 22
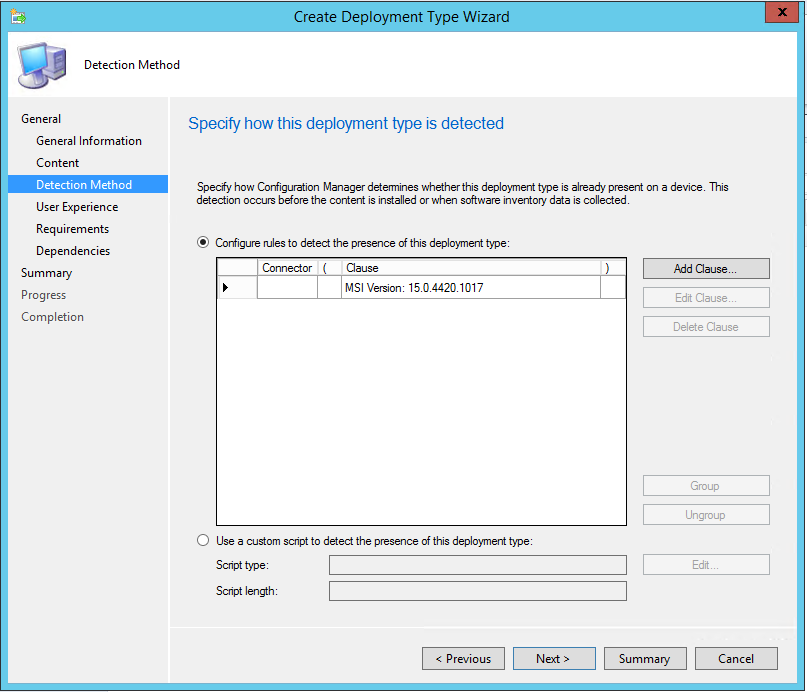
  36. Review information and click “Next”SCCM 2012 R2 - Deploying Microsoft Office 2013 Professional Plus - 23
  37. Change “Installation behavior” to “Install for system”
  38. Change “Logon requirements” to “Whether or not a user is logged on”
  39. Change “Installation program visibility” to “Hidden”
  40. Change “Estimated installation time (minutes)” to “20”, then click “Next”SCCM 2012 R2 - Deploying Microsoft Office 2013 Professional Plus - 24
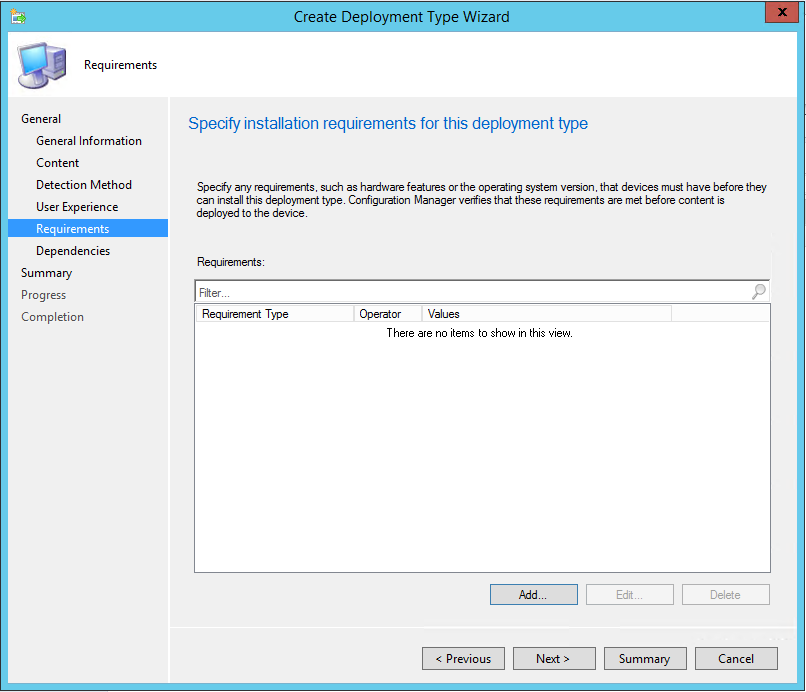
  41. If you would like to set requirements for the installation, such as minimum system requirements or primary device you can do so here, otherwise click “Next”SCCM 2012 R2 - Deploying Microsoft Office 2013 Professional Plus - 25
  42. If you would like to set a dependency for this installation such as .Net you can do so here, otherwise click “Next”SCCM 2012 R2 - Deploying Microsoft Office 2013 Professional Plus - 26
  43. Review all details here then click “Next”SCCM 2012 R2 - Deploying Microsoft Office 2013 Professional Plus - 27
  44. Click “Close”SCCM 2012 R2 - Deploying Microsoft Office 2013 Professional Plus - 28
  45. Once you have completed all the above steps you can then deploy this package to your collections and test installation (preferable to a small test group such as yourself first)

SCOM 2012 R2 – Monitor a Windows Service

In this post I will give detailed instructions on how to monitor a Windows service through SCOM 2012 R2.

For this example I will be creating a monitor to monitor a service called ‘LP360 License Server’ which only occurs on a single server

  1. Within the SCOM console, Navigate to the ‘Authoring’ tab, expand ‘Management Pack Objects’ and select ‘Monitors’SCOM - Authoring Monitors
  2. Right click on ‘Monitors’, expand ‘Create a Monitor’ and select ‘Unit Monitor…’SCOM - Authoring Monitors - Create Unit Monitor
  3. Expand ‘Windows Services’ and select ‘Basic Service Monitor’SCOM - Create Unit Monitor - Monitor Type
  4. From the drop-down menu, select the management pack that you wish to place this monitor into. For custom monitors I create a management pack which i have called ‘Service Monitoring’. Then click ‘Next’
  5. Give your monitor a name that is unique and specific to what you are monitoring, I called mine ‘LP360 License Server’SCOM - Create Unit Monitor - General
  6. Select a monitor target. if this service is specific to an operating system such as Server 2008 R2, then search for and select ‘Windows Server 2008 R2 Computer’ of the Discovery management pack. Otherwise select ‘Windows Computer’ to cover all Windows server and clients. Then click ‘Next’
  7. Select a ‘Parent monitor’ from the drop-down box. for custom monitors I create an Aggregate Rollup Monitor which is called ‘Custom Services’. If you have not got a custom one, select ‘Availability’, it can always be changed later
  8. Because this service is only on one server, I do not want the monitor enabled by default. Untick ‘Montor is enabled’, then click ‘Next’
  9. If you are confident of the service name then type it in the box. I strongly suggest clicking on the ‘…’ buttonSCOM - Create Unit Monitor - Service Details
  10. Click ‘…’, type the server name and click ‘OK’SCOM - Create Unit Monitor - Select Windows Service - Select Computer
  11. Locate the service you wish to monitor and click ‘OK’. When you use this method there can be no doubt as to the service nameSCOM - Create Unit Monitor - Select Windows Service
  12. Click ‘Next’
  13. The default health states are fine for monitoring services, so unless you have specific requirements for something different, click ‘Next’SCOM - Create Unit Monitor - Configure Health
  14. I turn on alerts for all service monitors, select ‘Generate alerts for this monitorSCOM - Create Unit Monitor - Configure Alerts
  15. Change the ‘Alert description’ to something that makes sense for you, mine is ‘The ‘LP360 Server’ Service has stopped.”
  16. Click ‘Create’
  17. Search ‘Monitors’ for your monitor, locate it under ‘Windows Computer’. Right click, expand ‘Overrides’, then ‘Override the Monitor’. Select ‘For a specific object of class: Windows Computer’SCOM - Create Unit Monitor - Search - Override
  18. Search for the server that is running the service, select the server and click ‘OK’SCOM - Create Unit Monitor - Override - Select Object
  19. Tick the ‘Override’ box the corresponds to the ‘Enabled’ parameter, then change the ‘Override Value’ to ‘True’. Click ‘OK’SCOM - Create Unit Monitor - Override - Enable
  20. Navigate to the ‘Monitoring’ tab, then select ‘Windows Computers’SCOM - Search for server - Right Click - Open
  21. Search for the server you just created the override for. Right click on the server, expand ‘Open’, select ‘Health Explorer’ for your server
  22. Navigate to where you placed the monitor, in my case it was ‘Custom Services’. Depending on your setup, you may have to clear the filter, it will be a yellow bar at the top of the left paneSCOM - Health Explorer - LP360
  23. Click on State Change Events to confirm when the monitor became active. It could take up to an hour for the monitor to become active. This is dependent on the amount of clients you are monitoring and the performance of your SCOM infrastructure